Fish'n'Dives Outback & Trailer Setup

Show off your kayak!
User avatar
Seasherpa
PHD in Yakology.
Posts: 2945
Joined: 28 Sep 2012, 10:31
kayak: Lots of composite ones
Real Name: Eoin (Owen)
Location: Seaford
Contact:

Fish'n'Dives Outback & Trailer Setup

Post by Seasherpa »

Outbacks have been done to death at this stage, lucky for me because I could steal everyone's ideas. Its all pretty standard fare, but here's the progress so far:
2 x Ram holders transferred over from the old yak and mounted in the side moulding.
Sailing rudder fitter
Hobie anchor trolley fitted
Sailing rudder, anchor trolley & flag whip
Battery installed in rear hatch wired with hobie through hull kit for sounder and 12v socket.
Dry box assembled from 40LB vittels vault (thanks for the idea Scrumpy) :thumbsup:
Dry box
Dry box
New sounder purchased Lowrance Elite 4 (ram mounted beside moulded in handle)
Elite 4 and extra mesh pocket for wiring
Light pole made from PVC and a versa light mounted on the dry box via ram mount
Versa light
Versa light
Side pocket added to tidy up sounder wiring and mirage drive bungee in transit. The 12v light socket is wired behind this pocket again usig the Hobie thru hull kit as this allows me to plug the light in or out as required saving battery. Once set-up this pocket also holds snacks as everything in the other pocket gets wet.I also made a tether for the mirage drive from an old brass seat carabina and the left over cord from the anchor trolley kit.
Cockpit
Cockpit
Ram ball added to cart to hold light or a go-Pro if I don't bring the dry box.
Extra ram mount
Extra ram mount
Hobie hatch liner has also been added to front hatch and deep gear bucket for SP's in middle hatch.

That's it so far!
Last edited by Seasherpa on 16 Dec 2013, 18:01, edited 2 times in total.
User avatar
CrazyChenski
Lord of the fish
Posts: 1879
Joined: 06 Apr 2011, 14:53
kayak: Clarkeski Dusta
Real Name: Steve
Location: Stab. Albans

Re: Fish'n'Dives Outback

Post by CrazyChenski »

Nice :clap: :clap:

Glad you have time to rig your outback up.... I'm planning to re-rig my Revo at the moment ....
Fishing is just like Accounting .... it is all about Optical Illusion ...............
User avatar
Babylon
Needs a life (forum tragic)
Posts: 4893
Joined: 02 Feb 2010, 21:43
kayak: 2017 Hobie Revo 13, Hobie Compass Duo
Real Name: Jim
Location: Corinella Victoria

Re: Fish'n'Dives Outback

Post by Babylon »

Outbacks might have been done to death mate but everyones is slightly different very nice job.Cheers babylon :thumbsup:
User avatar
laneends
Vyak Addict
Posts: 6641
Joined: 25 Jan 2013, 15:59
kayak: Quests 11 13 Adventure 16 Revo 16 ORSki epic k1
Real Name: Keith
Location: Melbourne, Bundoora

Re: Fish'n'Dives Outback

Post by laneends »

Looks good.

How do you find reaching for rear rods on the water with net and and rod also in front holder?

ram on cart is a nifty idea.

Can never have enough balls :evilgrin:
User avatar
Jay
Square eyes
Posts: 619
Joined: 15 Feb 2013, 03:40
kayak: 2014 Hobie Quest 13, 2015 Hobie Outback
Real Name: Jay
Location: Melbourne

Re: Fish'n'Dives Outback

Post by Jay »

Very neat and we'll finished !
User avatar
Seasherpa
PHD in Yakology.
Posts: 2945
Joined: 28 Sep 2012, 10:31
kayak: Lots of composite ones
Real Name: Eoin (Owen)
Location: Seaford
Contact:

Re: Fish'n'Dives Outback

Post by Seasherpa »

laneends wrote:Looks good.

How do you find reaching for rear rods on the water with net and and rod also in front holder?

ram on cart is a nifty idea.

Can never have enough balls :evilgrin:
Reaching the rear rods is fine, the net is usually in the rear one, but the next mod is to put a pvc pipe in the molded rear rod holder to hold the anchor reel as as the moment I have to take the net out every time i lift the reel.
I also put the anchor trolley right to the back despite what the instructions say about mounting both front and rear pulleys further in. This does cause the line to ride up over the curve of the yak but it also means that when taking in the anchor i can pull the line in with the anchor at the very back and the yak moves directly backwards through the water without turning to the current. Tried it in WP too and I'm happy with it even my tiny cooper anchor and a meter of chain held at LL no problems.(that's probably the strongest run I'll head out in anyway but I can always upgrade)
The ram mount on the cart is probably the only original idea I've used, it leaves the light nice and high over my shoulder.
The yaks fish landed record finally came to an end yesterday despite 11 hours on the water at Williamstown, Apex and Millers yesterday, unless of course a starfish counts?
User avatar
Seasherpa
PHD in Yakology.
Posts: 2945
Joined: 28 Sep 2012, 10:31
kayak: Lots of composite ones
Real Name: Eoin (Owen)
Location: Seaford
Contact:

Re: Fish'n'Dives Outback & Trailer Setup

Post by Seasherpa »

Packing and unpacking the yak each time is a bit of a pain so have been thinking about a trailer for a bit now. It also has the advantages of being able to take the roof racks off the car and wash it properly. Did some research and decided that an easytrailer was probably going to be the go. I toyed with the idea of a box trailer but like the advantage of being able to register as a boat trailer and therefore being able to park at boat ramps and have a rear overhang. I settled on the 8x4 frame from Easytrailer and opted for the spare wheel as an extra. I also picked up a gull wing ute toolbox on ebay that is 140 long allowing to store all my gear under lock and key keeping the fishing smell out of the car and SWMBO happy. Easy trailer do a set of skids for $199 but I opted for just the brackets $30 for 4 and picked up some treated pine from Bunnings and had a BCF giftcard that was used to pick up the skids $13 for 1.5 metres and these were just screw on using stainless selftapers.
http://www.bcf.com.au/online-store/prod ... 8416#Cross
The wheels are rated for 120kmph so I'm ready to roll for Adelaide and the trips to Wendouree will be a lot more comfortable without a yak on the roof at 110kmph on the highway.
Only downside so far is that I went to make an appointment for registration with vicroads and they have no spots till Christmas eve and its in Pakenham too so a bit of a hike seeing as we were supposed to be leaving on the 23rd and now will be leaving directly from Pakenham.
Anyway here are a few pics, I'll post up a review after the roadtrip.
Image
Image
Image
Drew wrote:looks good Eoin, the box is a godsend - I've got 2 on my trailer, and to be able to separate wet and dry items is great - we also carry the tent, inflatable mattress, etc in one box and the yak gear in the other when we go camping... hard to go wrong!

what did you make your skids with ? I'm looking for some 3/4 inch x 1/4 inch teflon strip at the moment, and struggling to find it for a reasonable price... considering buying a larger section, and cutting it down ...
Yeah Drew the box is awesome its long enough for the paddle lights and flag and high enough to fit the trax trolley in. The only thing I cna't get in there is the drybox I made. For the skids I used a 3m length of treated pine 45 x 70 mm and used the skids above and they fit on perfectly. There are a couple of dealers on ebay that supply the strips too that might have the size you are after.
]
Last edited by Seasherpa on 10 Mar 2014, 13:24, edited 1 time in total.
User avatar
Seasherpa
PHD in Yakology.
Posts: 2945
Joined: 28 Sep 2012, 10:31
kayak: Lots of composite ones
Real Name: Eoin (Owen)
Location: Seaford
Contact:

Outback & Trailer Setup -mini mods

Post by Seasherpa »

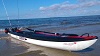
Being on holidays and having the wind blowing a gale for most of it I've made a few small mini-mods to the set-up:
With the standard hobie screw in cleats I found that the bungee unclipped when I turned the yak upside down and rather than having my drybox float off in the event of a capsize, I relplaced the cleats with screw-in eyes. I still wanted the bungee to be removable with out having to open the securing hooks so I added some stainless chain links for this purpose, simple but it does the job!
Eye with chain link
Eye with chain link
photo 1 (2).JPG (30.37 KiB) Viewed 4200 times
Next up was a ram ball in the 1.5 inch sizing to take a rod holder when bait fishing, I already had the ram extender from SLH so it moves over there and doesn't hit the mirage drive. The bonus now is that the left hand side of the yak is now completely free for re-entries.
Ram ball in sail mast mount
photo 1.JPG (33.24 KiB) Viewed 4200 times
I also had a play with th edry box, put two more rod holders on the back and the criss-cross bungee on the side holds my drogue and bilge pump. On the other side I added a piece of 90mm PVC to hold my anchor.
photo 2 (2).JPG
photo 2 (2).JPG (46.77 KiB) Viewed 4200 times
Anchor holder
Anchor holder
photo 3.JPG (34.68 KiB) Viewed 4200 times
When installing the anchor trolley, the paddle holder on the left was removed to an replaced by the two eyes that the trolley runs through. The second paddle holder is handy to have and I figure it could hold a rod when getting back in in rough conditions so to re install it I opened one end to remove the hobie fittings, threaded it through the eyes and re-knotted it; nice and easy!
Paddle holder
Paddle holder
photo 2.JPG (36.66 KiB) Viewed 4200 times
Last up was fitting a basket in the middle hatch, I had a crack at this before but wasn't happy with the end result it was hard to get a good fit due to the curvature of the hull. This time round I got an oval washing basket from bunnings for $2.60 and a pool noodle from kmart. I cut the pool noodle in half and then threaded some rope through both halves and tied the ends. I then cut the basket to the desired height and then put the pool noodle underneath the centre and cable tied it to the basket via the rope. (Should have taken a pic!) When I put it in the hatch the halves of the pool noodle sits perfectly in the curve of the hull (side by side) and the basket doesn't move.
Centre hatch basket
Centre hatch basket
photo 3 (2).JPG (31.16 KiB) Viewed 4200 times
Basket with pool noodle
User avatar
CrazyChenski
Lord of the fish
Posts: 1879
Joined: 06 Apr 2011, 14:53
kayak: Clarkeski Dusta
Real Name: Steve
Location: Stab. Albans

Re: Fish'n'Dives Outback & Trailer Setup

Post by CrazyChenski »

Nice mode for the centre hatch. Is it easy to take out the basket if needs to?
Is there any drain hole under the basket? I had problem with my container in there as sometime water get drain into the centre hatch when i open it, as the container is an open container and no drain hole, water get collected in the container which mean some of the gear and stuff in the container get soaked.
Fishing is just like Accounting .... it is all about Optical Illusion ...............
User avatar
Seasherpa
PHD in Yakology.
Posts: 2945
Joined: 28 Sep 2012, 10:31
kayak: Lots of composite ones
Real Name: Eoin (Owen)
Location: Seaford
Contact:

Re: Fish'n'Dives Outback & Trailer Setup

Post by Seasherpa »

I've drilled a small hole in the bottom of the basket for that same reason Steve, I haven't tried removing it yet but I imagine it would just be a case of cutting the cable tie to separate the basket and the noodle and then out the way it went in.
Post Reply