Work's been pretty busy the last couple of weeks but today I finally got a few hours free to do some rigging on the new yak.
Here's how she looked at the factory day 1:
Anchor Trolley Install
With snapper season almost here first up was an anchor trolley from bow to stern on the starboard side. Pictures aren't great in the underground carpark:
For my pulleys, the front attachment point was a stainless carabina to the front carry handle and for the rear I took the tab on the side for the seat and moved it under the rear handle and connected the second carabina there. Then on each of the bungee holders along the side I added some p-clips to run the anchor line through. The pics should explain it better:
FishnDive's Stealth Fisha 500 -Rigging
- Seasherpa
- PHD in Yakology.
- Posts: 2945
- Joined: 28 Sep 2012, 10:31
- kayak: Lots of composite ones
- Real Name: Eoin (Owen)
- Location: Seaford
- Contact:
FishnDive's Stealth Fisha 500 -Rigging
Last edited by Seasherpa on 30 Aug 2015, 17:19, edited 1 time in total.
- Seasherpa
- PHD in Yakology.
- Posts: 2945
- Joined: 28 Sep 2012, 10:31
- kayak: Lots of composite ones
- Real Name: Eoin (Owen)
- Location: Seaford
- Contact:
Re: FishnDive's Stealth Fisha 500 - Hatch Mods
A couple of quick mods to the fish hatch lid:
First mod was to add a quick close bungee, doing up the straps on the hatch during sp/squid sessions would be a pita:
Vic regs require an epirb for offshore work so I added mine to the underside of the hatch lid for easy access, it will stay with the boat and I'll have a PLB and mobile with me in the PFD.
The back hatch will be replace with a hobie one at some stage as I much preferred it on the Evo, until I get around to that I'll make do but did get Dennis to add a couple of extra rod holders pro fish style and I've added a railblaza hd starport to hold my berleypro light for night fishing and a flag offshore.
For anyone else doing this mod, the rear hatch is different to the one in my old evo and doesn't protrude back as far. Its a different material too, my old Evo had the same material as the fish hatch in the back but this has a black plastic container. Due to the hatch not protruding back as far, you can't get the railblaza port on the flat part of the deck AND have the four bolts coming through to the back hatch. Only the front two bolts will come through to the hatch with the rear two coming through the deck behind the hatch wall if that make sense? As a result I made a backing plate that fits on the back inside the hatch and had to use two bolts in the front two holes but two self tappers in the back two. Realistically though the front two bolts with a backing plate is plenty to hold the starport on there anyway.
Last edited by Seasherpa on 30 Aug 2015, 14:20, edited 1 time in total.
- Seasherpa
- PHD in Yakology.
- Posts: 2945
- Joined: 28 Sep 2012, 10:31
- kayak: Lots of composite ones
- Real Name: Eoin (Owen)
- Location: Seaford
- Contact:
Re: FishnDive's Stealth Fisha 500 - Fish Finder install
Before the yak arrived I had a different fish finder install planned. I found installing the inspection hatch in the fishbox was a pain to do in the Evo because it is a tight space to work in and wasn't looking forward to doing it again. The idea I had was to install the inspection hatch in the flat bungee/cargo area behind the rear hatch. I had thought to epoxy in a foam battery holder under that back deck and mount the transducer in there too. Then I would put a hobie thru hull plug in the side of the fish hatch and send some fishing line/light wire back through that hole to pull the wiring through to the fish hatch. BTW the new model thru hull plugs dont have that nut on the back they have a flat screw on plate. Its the same ones that Hobie used in the special edition outback.
That was the plan at least but when the boat arrived, it seems that Stealth are now running out their boats with the little square 1.5Ah battery holder/hatches installed in the fish hatch. I decided to go with that and put the tranny in there. I picked up a Tallon mount to tidy up the install on the hatch lid. I then added some p-clips to the battery plate and fed through some bungy cord to hold the battery box in place for the sounder.
Sounder mounted on the tallon mount is easily adjustable and well out of paddle stroke. It just remains now to see how well the connections in the tallon mount hold up to corrosion. With inox and dielectric grease I'm hoping they will be fine. I've also added a 'rod ruler' along the edge of the hatch lid for quick measures.
Saw in one of Jamie D's videos he had added a fish length sticker in the fishbox and thought that was a clever idea so did that too.
Last edited by Seasherpa on 23 Dec 2015, 09:42, edited 2 times in total.
-
- PHD in Yakology.
- Posts: 2728
- Joined: 19 Jun 2011, 18:18
- kayak: Streaker Tournament/Zodiac
- Real Name: Derwood
Re: FishnDive's Stealth Fisha 500 - Anchor trolley install
Nice rig Eoin.
- cheaterparts
- Needs a life (forum tragic)
- Posts: 5758
- Joined: 29 Mar 2010, 07:04
- kayak: Stealth Profisha 525 ---
- Real Name: Stephen-The Mud King
- Location: Cranbourne
Re: FishnDive's Stealth Fisha 500 - Anchor trolley install
Good to see you new ride coming along -- just wondering does the seat height look the same as the evo or have they dropper it lower like the pro fishers
My kayak PBs
Gummy shark 128 Cm -- Elephant fish 85 Cm -- Snapper 91 Cm -- KG Whiting 49 Cm -- Flathead 55 Cm -- Garfish 47 Cm --Long tail Tuna 86 cm -- Silver Trevally 40 Cm -- Cobia 117 Cm -- snook 53 Cm -- Couta 71 Cm -- Squid 44 hood length
cheater
0402 208 657
Gummy shark 128 Cm -- Elephant fish 85 Cm -- Snapper 91 Cm -- KG Whiting 49 Cm -- Flathead 55 Cm -- Garfish 47 Cm --Long tail Tuna 86 cm -- Silver Trevally 40 Cm -- Cobia 117 Cm -- snook 53 Cm -- Couta 71 Cm -- Squid 44 hood length
cheater
0402 208 657
- Nello
- Qualified Fish Monger
- Posts: 420
- Joined: 16 Apr 2015, 09:36
- kayak: Red Ai and a tinny.
- Real Name: Nelson
- Location: whittlesea
Re: FishnDive's Stealth Fisha 500 - Anchor trolley install
Nice setup eoin, is looking very nice!
- Seasherpa
- PHD in Yakology.
- Posts: 2945
- Joined: 28 Sep 2012, 10:31
- kayak: Lots of composite ones
- Real Name: Eoin (Owen)
- Location: Seaford
- Contact:
Re: FishnDive's Stealth Fisha 500 - Anchor trolley install
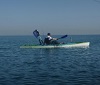
The hull is supposed to be similar to the Evo 495, but I'm thinking now it might be similar to the second generation Evo (which I haven't seen in the flesh) not my first generation one. The seat is lower than my Evo but not as low as Minny's 575, its a couple of cms narrower than the 495 and it looks like they have added a bit of rocker (The second gen Evo may have had this too).cheaterparts wrote:Good to see you new ride coming along -- just wondering does the seat height look the same as the evo or have they dropper it lower like the pro fishers
- GoneFishn
- PHD in Yakology.
- Posts: 2835
- Joined: 04 Feb 2010, 19:01
- kayak: OceanKayak Prowler Elite 4.5 "Calypso"
- Real Name: Kelly
- Location: Wyndham Vale
Re: FishnDive's Stealth Fisha 500 -Rigging
Nice upgrade mate mods looking good so far.
- Smish
- Lord of the fish
- Posts: 1747
- Joined: 23 Nov 2010, 22:12
- kayak: Viking Profish Reload
- Real Name: Andrew
- Location: Williamstown
Re: FishnDive's Stealth Fisha 500 -Rigging
Those Stealths are nice looking yaks. It's always a process tweaking the mods but that's part of the fun.